Conda Virtual Environment & Commands
Essential conda commands: create, activate, install (conda + pip), deactivate, and delete environments — the Anaconda workflow.
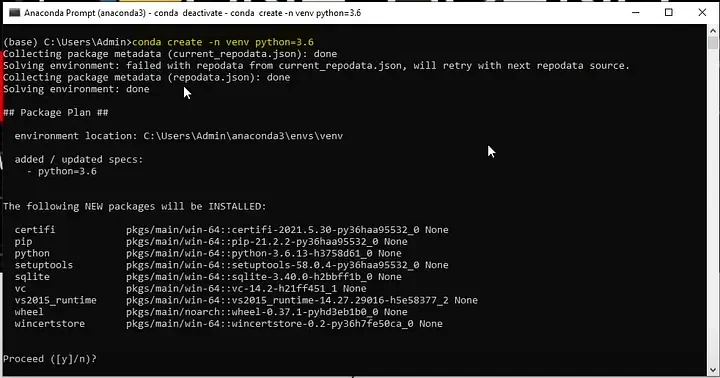
Conda is a package and environment manager that installs software — including Python itself — into isolated, named environments.
Unlike pip, which only installs Python packages into an existing interpreter, conda treats the interpreter as just another package: conda create -n myenv python=3.12 builds a fresh environment with its own Python version, its own libraries, and its own compiled binaries.
That last part is why data scientists reach for it — conda ships pre-built non-Python dependencies (MKL, CUDA, HDF5, GDAL) that pip would otherwise expect your system compiler to provide.
The five commands that cover daily use are create, activate, install, deactivate, and remove --all, with conda env export handling reproducibility.
Conda ships with the full Anaconda distribution or the minimal Miniconda installer; both give you the same command set.
Why Anaconda?
Anaconda is a Python distribution built for data science. It ships with over 300 packages — NumPy, Pandas, Matplotlib, Scikit-learn, Jupyter — pre-installed. More importantly, it includes conda, a package and environment manager that solves the version conflict problem data science practitioners constantly face.
Different projects often need different versions of the same library. Conda lets you create isolated environments — each with its own Python version and packages — so projects never interfere with each other.
If you don't need the 300-package bundle, Miniconda installs just conda and Python — a few hundred megabytes instead of several gigabytes — and you add only what each project needs. The commands below are identical either way.
How Is Conda Different from pip and venv?
The two toolchains overlap but answer different questions.
pip + venv assume Python is already installed and manage Python packages inside it (new to that side? start with Python virtual environments).
Conda manages everything — interpreter, Python packages, and compiled system libraries — from its own package repositories (channels).
| Aspect | pip + venv | conda |
|---|---|---|
| What it installs | Python packages from PyPI | Packages in any language from conda channels |
| Python interpreter | Must already exist on the system | Installed per environment (python=3.12) |
| Non-Python dependencies | Needs system compilers/libraries for source builds | Ships pre-built binaries (MKL, CUDA, GDAL, HDF5) |
| Environment tool | Separate module (venv) | Built into the same command |
| Default package source | PyPI | defaults / conda-forge channels |
| Typical user | Web and general Python development | Data science, ML, scientific computing |
Neither is "better" — pick conda when your stack leans on heavy compiled dependencies, and pip + venv when everything you need lives on PyPI.
Video Tutorial
Create a Virtual Environment
Specify the Python version when creating — this prevents compatibility issues with packages like TensorFlow and PyTorch that require specific Python versions:
conda create -n <name of virtual environment> python=x.xExample: conda create -n myenv python=3.10
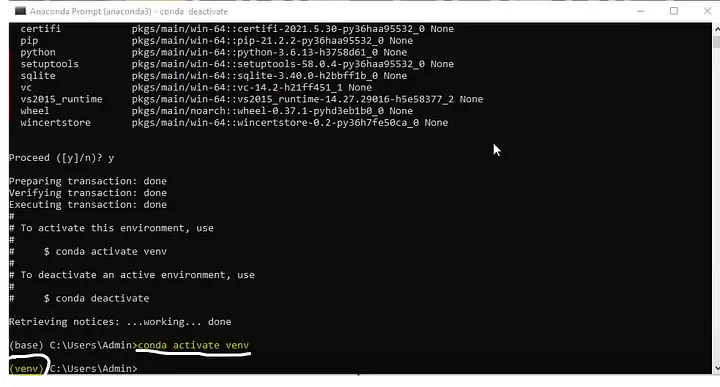
Activate the Environment
conda activate <name of virtual environment>Your terminal prompt will show the environment name in parentheses once activated: (myenv) $
Install Packages
Using conda (preferred for data science packages — handles non-Python dependencies):
conda install <package name>Using pip (for packages not available in the conda repository):
pip install <package name>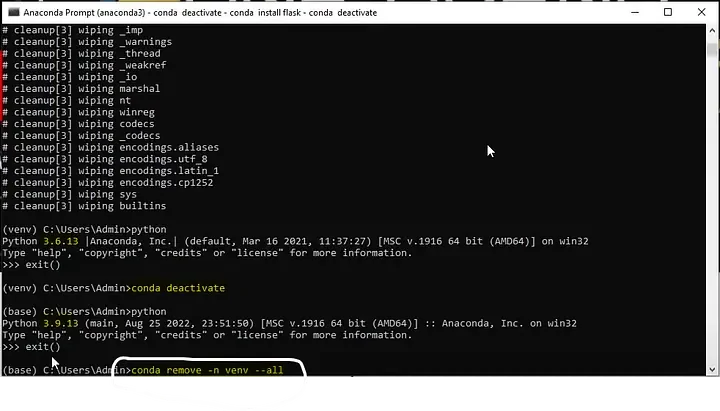
Deactivate the Environment
conda deactivateReturns you to the base environment.
Delete an Environment
conda remove -n <name of virtual environment> --allThe --all flag removes all packages along with the environment.
How Do You Export and Recreate an Environment?
Conda's equivalent of requirements.txt is environment.yml. Export the active environment, commit the file, and anyone can rebuild it:
# capture the active environment
conda env export > environment.yml

# rebuild it on another machine
conda env create -f environment.yml
A full export pins every package and build string — maximally reproducible, but often tied to one operating system. For a portable file that lists only what you explicitly asked for, use:
conda env export --from-history > environment.yml
Two inspection commands round this out: conda env list shows every environment on the machine (the active one is starred), and conda list shows every package inside the active environment.
Can You Mix conda and pip in One Environment?
Yes — it's routine, since plenty of packages live only on PyPI. But order matters:
install everything you can with conda first, then use pip for the rest.
Conda doesn't track pip-installed packages when solving dependencies, so a later conda install can silently overwrite files pip put there.
If the environment does get tangled, the fix is cheap: delete it and rebuild from your environment.yml.
Performance note: since conda 23.10 the fast libmamba solver is the default, so the long "Solving environment..." waits older tutorials complain about are largely gone. If you're on an older conda, conda update -n base conda gets you there.
Command Reference
conda create -n myenv python=3.10— create environment with Python 3.10conda activate myenv— activate environmentconda install numpy— install package via condapip install package— install package via pip (when conda repo lacks it)conda deactivate— deactivate environmentconda remove -n myenv --all— delete environment entirelyconda env list— list all environmentsconda list— list packages in the active environmentconda env export > environment.yml— export environment for sharingconda env create -f environment.yml— recreate environment from file