Python Virtual Environment — Introduction
Why virtual environments exist, how virtualenv creates isolated Python environments, and the commands to use them on Linux and Windows.
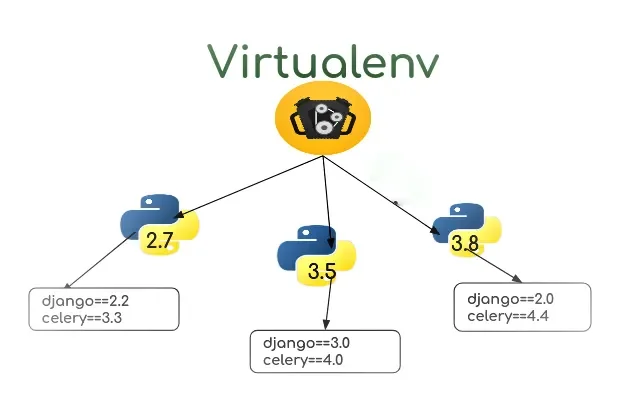
A Python virtual environment is a self-contained directory that holds its own Python interpreter and its own site-packages folder, isolated from every other project on the machine.
When the environment is active, python and pip resolve to the environment's copies, so every package you install lands inside the project instead of the global installation.
This solves Python's core dependency problem: the global site-packages directory can only hold one version of any package, so two projects that need different Django or NumPy versions cannot coexist without isolation.
Virtual environments are created with the third-party virtualenv package or the built-in venv module (python3 -m venv .venv), take seconds to build, and are cheap to delete and recreate — removing the folder removes the environment completely, with nothing left behind in the system Python.
They are considered mandatory practice for every Python project, no exceptions.
Why Do We Need Virtual Environments?
Python installs packages into a single global site-packages directory.
When you're working on two Django projects — one using Django 2.6, another needing Django 3.2 — they fight over the same installation slot.
Python can't have two versions of Django installed globally at once.
Virtual environments solve this by creating self-contained folders, each with their own Python interpreter and packages. Project A sees Django 2.6. Project B sees Django 3.2. Neither knows the other exists.
When Should You Use a Virtual Environment?
Always. Every Python project should have its own virtual environment. Create it inside or alongside the project directory and activate it before installing any packages. Never install project dependencies into the global Python installation.
A few situations make the rule especially non-negotiable:
- Multiple projects on one machine — the original problem: two projects, two conflicting dependency sets, one global slot
- Reproducing a colleague's setup — a clean environment plus a
requirements.txtrecreates their exact package versions without guessing - Trying a new library safely — install it in a throwaway environment; if it drags in fifty dependencies you don't want, delete the folder and nothing else changes
- System Python protection — on Linux and macOS, the OS itself depends on the system Python. Modern distributions (Ubuntu 23.04+, Debian 12+) now mark it externally managed and refuse
pip installoutside a virtual environment entirely — the famousexternally-managed-environmenterror exists precisely to force this practice
What Happens If You Skip It?
Nothing — at first. Your first project installs fine globally. The problem surfaces on project two, when upgrading a shared dependency for the new project silently breaks the old one.
By project five, the global site-packages is an archaeological dig: hundreds of packages, no record of which project needs which, and no safe way to upgrade anything.
Cleaning that up costs far more time than the ten seconds it takes to create an environment per project.
How Does a Virtual Environment Work?
virtualenv builds a folder containing a copy of the Python interpreter, pip, and an isolated site-packages directory.
When activated, your shell's PATH is prepended with the virtual environment's bin/ directory — so python and pip point to the environment's copies, not the system's.
That's the whole trick. Deactivation just restores the original PATH.
The environment itself is an ordinary folder — you can inspect it, and deleting it is a complete, clean uninstall of everything inside.
Should You Use venv or virtualenv?
Since Python 3.3, the standard library ships venv — a built-in module that does the same job with zero installation:
python3 -m venv .venv
source .venv/bin/activate    # Linux / macOS
.venv\Scripts\activate       # Windows
Naming the folder .venv is the modern convention — VS Code and PyCharm auto-detect it, and it stays hidden in directory listings.
The third-party virtualenv package still exists and remains faster at creating environments (it caches wheels), can target Python versions other than the one running it, and works on older interpreters.
For everyday work on a single modern Python, venv is all you need.
One Python 3.12+ note: new environments now ship with pip only — setuptools and wheel are no longer pre-installed, so install them explicitly if a legacy build process expects them.
How Do venv, virtualenv, conda, and Poetry Compare?
| Tool | Ships with Python | Manages Python versions | Non-Python dependencies | Best for |
|---|---|---|---|---|
| venv | Yes (3.3+) | No — uses the Python that created it | No | Default choice for most projects |
| virtualenv | No (pip install) | Yes — can target other installed interpreters | No | Faster creation, older Pythons, tooling that builds many envs |
| conda | No (Anaconda/Miniconda) | Yes — installs Python itself per environment | Yes — compiled libraries (MKL, CUDA, GDAL) | Data science stacks with native dependencies |
| Poetry / uv | No | uv: yes; Poetry: via existing interpreters | No | Application packaging with lockfiles and dependency resolution |
These tools are complements, not competitors: Poetry and uv create a venv-style environment under the hood, and conda environments serve the same isolation purpose with a wider dependency scope. Whichever you pick, the principle is identical — one project, one isolated environment.
Installing virtualenv
pip install virtualenvvirtualenv --versionCreating a Virtual Environment
virtualenv my_nameTo specify a Python version explicitly:
# Python 3
virtualenv -p /usr/bin/python3 virtualenv_name

# Python 2.7
virtualenv -p /usr/bin/python2.7 virtualenv_name
Activating the Environment
Linux / macOS:
source virtualenv_name/bin/activateWindows:
virtualenv_name\Scripts\activateOnce activated, the prompt changes to show the environment name:
(virtualenv_name)$Installing Packages Inside the Environment
(virtualenv_name)$ pip install Django==2.9This installs into the virtual environment only — not the system Python.
Deactivating
(virtualenv_name)$ deactivateReturns your shell to the system Python. The virtual environment persists on disk — just run activate again to re-enter it.
Video Tutorial
Commands Summary
pip install virtualenv— install virtualenvvirtualenv myenv— create environmentvirtualenv -p /usr/bin/python3 myenv— create with specific Pythonsource myenv/bin/activate— activate (Linux/Mac)myenv\Scripts\activate— activate (Windows)pip install package==version— install into environmentdeactivate— deactivate environment
See also: requirements.txt in Python — how to capture and share your environment's exact dependencies.